Monday, August 31, 2009

289- Butterfly Waterfall


Again I wanted to make a waterfall and use pastels for the butterfly images on the squares.

To make the background I first stamped all the small butterflies. I then used clear embossing on some of the butterflies so they looked like they were in front of the grass.

Recipe:

Stamps: Flight of the butterfly, Inspired by Nature

Paper: Certainly celery, whisper white, almost amethyst

Ink: Almost amethyst, pretty in pink, certainly celery, perfect plum

Accessories: Clear embossing, soft subtles brads, Stampin' Up! pastels, versamark, sponge daubers, dazzling diamonds


Click here to order these fabulous Stampin' Up products

Sunday, August 30, 2009

288- True Friend Surprise Pop-Up


This card used two really fun techniques- pastel embossing and surprise pop-up. It also used the great new in colours- I love how bright and bold they are.

I used the pastel embossing technique to give the flower some pop. With the Stampin' Up! pastels you get every single colour that we sell (excluding the in-colours). You can add colour to any embossed image using a blender pen (sold in my starter kit) and the pastels- you emboss in white and then colour on top.

To do the surprise pop-up I used sticky strip. I'm telling you- this is a must have product...especially on movable cards. This card does need to be finished off with a ribbon- I'm just waiting to order the new in colour ribbons and I will add the crushed curry ribbon to help pull up the insert. If you are interested in participating in my ribbon share please look at the posting below for more information.

Recipe:

Stamps: True Friend

Paper: Melon mambo, crushed curry, rich razzleberry

Ink: Melon mambo

Accessories: White embossing, stampin pastels, blender pen, tag corner punch, jumbo pewter eyelets, cropodile, sticky strip

Click here to order this fantastic stamp set and shop for other great Stampin' Up! products including our pastels

In Colour Ribbon Share


I am really excited to do my first product share!! This first one will involve the polka dot In Colour 1/2" grosgrain ribbon (pg. 182). This gorgeous ribbon has whisper white dots on one side and is plain on the other side.

For $14.50 you will get 2 yards (6 feet) of each of the 6 colours of ribbon (includes tax and shipping).

To order you can either email/call me or pay right now with paypal. As soon as the order comes in I will ship it out to you. This offer is only available to Canadians.

If you have any ideas about any other shares that you would be interested in please let me know- I think I will do these regularly. Other ideas that I have are buttons, brads and corduroy buttons.


Saturday, August 29, 2009

287- Daisy Chalkboard Suspension Card


I am really enjoying playing with my chalks- I really wasn't using them enough. I wanted to use them to make this suspension card- I have never made one with such a large movable centre and wasn't sure if it would work. I am really happy with the finished product though- I think it's quite pretty.

The chalkboard technique is the best way to use chalks on dark cardstock. You stamp with craft ink then you can sponge the chalks on top. It really makes the colours pop.

As for the suspension part I used dental floss and sticky strip.

Recipe:

Stamps: Inspired by nature

Paper: Ruby red, summer sun, basic black

Ink: craft white

Accessories: Stampin Pastels, coluzzle, corner rounder, mat pack, sponge daubers

Click here to order this stamp set and to shop for other amazing Stampin' Up! products

Friday, August 28, 2009

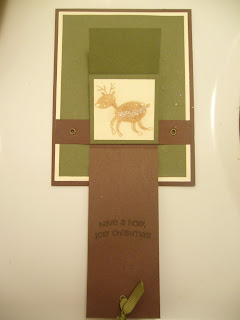
286- Reindeer Waterfall


This is a new technique for making a waterfall card for me and I really like it- it is so much simpler than what I have done before. I followed these instructions on splitcoast and it was really straightforward.

I used chalks to make it a bit more subtle than using inks. I used the poppin pastels technique for the whole card. In the future I would use the chalkboard technique to make sure the colour popped more on the sentiment since it is on chocolate chip cardstock.

I used sticky strip to adhere the elements of this card because I wanted it to really hold together through all the movement

Recipe:

Stamps: A Holly Jolly Christmas

Paper: Chocolate chip, very vanilla, always artichoke

Accessories: Stampin Pastels, sponge daubers, Big Shot, Texturz Plate, metallic eyelets, cropodile, 1/4" always artichoke grosgrain ribbon, versamark, sticky strip

Click here to order this amazing Christmas stamp set and to order other fantastic Stampin' Up! products

Tuesday, August 25, 2009

285- Baby Elephant Card


This is a card for a baby shower for a little girl. I wanted to keep it really clean and simple but with a little bit of shine. I put a layer of clear embossing on the top the elephant using my stamp-a-ma-jig.

I used this layout from MojoMonday as inspiration

Recipe:

Stamps: Animal Stories

Paper: Pretty in pink, whisper white

Ink: Pretty in pink

Accessories: Big shot, texturz plate, pretties kit, scallop edge punch

Click here to order this super cute stamp set and to shop for other amazing Stampin' Up! products

Monday, August 24, 2009

Pocket Silhouettes Card Kit


Here is my new card kit using Pocket Silhouettes and Earth Elements paper with a diamond theme. I was inspired with the idea that diamonds are a girl's best friend- hehe! You will receive all of the instructions and designs necessary to complete these fantastic projects. This is a great card kit to ring in the fall. The box will fit the 4 cards plus envelopes.

I am offering this as a class on Sunday, September 20th at 1pm at my condo in Mississauga. The cost of the class will be $32 and you will leave with the stamp set and the 5 projects.

For my Canadian customers who cannot make it to the class I am selling this as a card kit. You will receive the Pocket Silhouettes stamp set, detailed instructions with photos over 40 colour photos, and all of the materials required to make each of the 4 cards plus the box. The cost of this kit will be $37 and this includes tax and shipping.


Sunday, August 23, 2009

Pocket Silhouettes Class Planner


Here is my new class planner using Pocket Silhouettes and Earth Elements paper with a diamond theme. I was inspired with the idea that diamonds are a girl's best friend- hehe! You will receive all of the instructions and designs necessary to complete and demonstrate these fantastic projects. This is a great class to ring in the fall.

This planner will give you step by step instructions to make these 4 cards and coordinating box, including over 40 colour photos. It also outlines all of the products that you will need to make the projects and suggested class prices. I also give lots of tips and upselling ideas as well as alternate materials that you could use instead of those featured here. The box will fit the 4 cards plus envelopes.

The cost of this class planner is $15 Canadian and it can be sold internationally. Once I receive confirmation of the payment I will email you the PDF of the planner.


For my Canadian customers I am also selling this as a card kit. You will receive the Pocket Silhouettes stamp set, detailed instructions with photos, and all of the materials required to make each of the 4 cards plus the box. The cost of this kit will be $37 and this includes tax and shipping.


285- Stained Glass Rose


It has been a while since I did a stained glass card and wanted to make one. I wanted to use very soft colours so the end products was very feminine.

I don't actually own a scallop oval die but it is really easy to scallop any punch out that you have. All you have to do is slide off the bottom case from the corner rounder. You can them go around the oval and punch out scallops- it takes a while but the end product is fantastic.


To do the stained glass image I first stamped the image on the acetate with stazon. I then rubbed ink from my ink pad on a piece of plastic then put some crystal effects on top. I mixed this with a paint brush then painted it on the image. Had I had reinkers for these dies the colour would have been much darker but this is a good alternative when you only have the ink spots.

Recipe:

Stamps: Embrace Life

Paper: Bashful blue, Sage Shadow, Blush Blossom

Ink: Stazon black, sage shadow, blush blossom

Accessories: Coluzzle, acetate, crystal effects, corner rounder, photo corners punch, big shot, texturz plate

Click here to purchase this beautiful stamp set and to shop for other great Stampin' Up! products at my online store

Sincere Salutations Stamp Class


If you are in the Mississauga area I am teaching an amazing class next Sunday, August 30th at 1pm. In this class you will make 8 absolutely spectacular projects using this set and the 5/8" grosgrain ribbons. It is by far my favourite sentiment set which I use more than any other- it is the all around perfect set! You will leave with the 8 cards and the Sincere Salutations set. If you are unable to attend this class it will be available as a class kit and you will receive all of the materials and instructions to make the projects at home. If you are out of town please add $5 for shipping. BYO adhesive. For more information please email me at mcgill15@hotmail.com

Click here to order this amazing sentiment set at my online store

Saturday, August 22, 2009

284- Manly Tree Shaker


When I saw this colour challenge on splitcoast (CC232) I wanted to use it to make a manly card. I find these to be the hardest cards to make since I am drawn to glitter and ribbons. I also wanted to see if I could make a shaker card that was male appropriate.

I really think this worked well- of course I had to use lovely as a tree. I wanted it to look like you were looking out a window. Yes it has glitter but you need it for the shaker- I used fine glitter instead of the chunky sprinkles that I normally use because I feel they are more feminine.

In the end I'm happy with the end product- I do think I could give this to a guy and he would love it.

To make sure the brads are all perfectly lined up I used a ruler on the back of the paper and measured it all out to make sure it was exact- I hate when they don't line up! Although if you have a mat pack with the holes you could use that as well

Recipe:

Stamps: Lovely as a tree

Paper: Close to cocoa, taken with teal, very vanilla

Ink: Close to Cocoa

Accessories: acetate, fine cosmo glitter, vanilla hodgepodge hardware, coluzzle, big shot, texturz plate

Click here to order this fantastic set and other amazing Stampin' Up! products online

Friday, August 21, 2009

283- Noel Card


I used retired DSP from last year and this great Christmas set to make this card using the layout from MojoMonday. It is hard to see in the picture but I embossed the entire piece of Whisper White with irridescent embossing powder so it gives a really nice shine to the card.

I took the picture of the card at a different angle than normal. Let me know what you think- should I stick with this or do you like the pictures to be straight on?

Recipe:

Stamps: Big on Christmas

Paper: Ski Slope DSP, Real Red, Old Olive, Whisper White

Ink: Real red, old olive, baha breeze

Accessories: Scallop edge punch, round tab punch, tag corner punch, irridescent
embossing, 1/4" real red grosgrain ribbon, double rectangle punch, markers, blender pen

Click here to purchase this fantastic Christmas set at my online store.

Thursday, August 20, 2009

282- Love you a Latte!


I love layout challenges- they are so much fun! I find the hardest part of stamping is the layout and these challenges make me branch out from my usual patterns.

As soon as I saw this layout for Mojo Monday I knew I wanted to use this stamp- I've had the set forever but have never used it. I also loved the paper and colours- I'm really happy with the finished product.

I stamped the image on a piece of whisper white then coloured in the cup with my blender pen. To soften the whisper white paper I sponged it with pink pirouette

Recipe:

Stamps: Pun Fun

Paper: Bravo burgundy, so saffron, Parisian Summer DSP, whisper white

Ink: Bravo burgundy, so saffron, pink pirouette

Accessories: Jumbo pewter eyelets, cropodile, 5/8" bravo burgundy grosgrain ribbon, round tab punch, sponge, dazzling diamonds

Tuesday, August 18, 2009

281- Sweet Cupcake Birthday


I made this card for the MojoMaria layout challenge. This is an 8 1/2" x 5 1/2" card that I made for a coworker- we need to make big cards so all of my coworkers can sign it.

Whenever I have to make a birthday card it is really hard for me to not use my Crazy for Cupcakes- I just adore the set! This is also my favorite DSP of all time- I was so upset when Stampin' Up! retired it.

Recipe:

Stamps: Crazy for cupcakes

Paper: Regal rose, chocolate chip, Sweet Always DSP, whisper white

Ink: Chocolate chip, regal rose, rose red, pumpkin pie

Accessories: Dazzling diamonds, corner rounder, 5/8" regal rose grosgrain ribbon, 5/8" chocolate chip grosgrain ribbon, scallop edge punch

To order this fantastic birthday set click here

280- Silver Snow Swirled

As soon as I saw this layout challenge (SC241) I knew that I wanted to make a Christmas card. I love the simplicity of the finished product. It's hard to see but I added snowflakes on the side panels with irridescent embossing.

Recipe:

Stamps: Snow Swirled

Paper: Whisper White, Silver

Ink: Silver

Accessories: ticket corner punch, silver embossing, iridescent embossing, filigree brads

Click here to order this fantastic stamp set and other amazing Stampin' Up! products

Monday, August 17, 2009

279- Wedding Cake Tuxedo Card


I wanted to make a tuxedo wedding card that was really simple and elegant

Recipe:

Stamps: For the bride

Paper: Basic Grey, Basic Black, Whisper White

Ink: Basic Grey

Accessories: So Swirly wheel, corner rounder, silver embossing

Click here to order this beautiful wedding set as well as other amazing Stampin' Up! products

Sunday, August 16, 2009

278- Baby Leo Spinner Card


I have a new little nephew that was born on Friday August 7th. He is another little Leo in the family so I wanted to make him a card with a punch art lion. Plus a spinner card is always fun for a little boy!

To make the mane you use the scallop circle punch. You take your punched image and place a glue dot in the centre. You then put it on your finger and put it back in the punch, turn it slightly and punch again- you will get this pointy effect which is great

Recipe:

Stamps: Inspired by nature, warm words

Paper: Soft suede, very vanilla, basic black, more mustard

Ink: Certainly celery, chocolate chip

Accessories: 1 3/8" 1 1/4" 1/2" 1/4" circle punches, marker, scallop circle punch, large oval punch, scallop oval punch, corner rounder, thread, pennies

Saturday, August 15, 2009

They Say It's My Birthday

I am fortunate to have some great friends who are all fantastic stampers! I received some amazing birthday cards that I really want to share.
Julie Weisflock made me this one- love the colours! The middle present is popped out
My stepmother made me this flip card using Old Olive DSP and a picture of two of my dad's dogs Tobey and Lola. How cute are they?!
Katrina MacAlpine made me this large joy fold card and it was signed by my coworkers. Love the colours- so fun and summery! And we all know I adore the Cheers to You stamp set!
Marni Shelson made this card with my most favorite birthday set Crazy for Cupcakes! How cute is that?!
Sheila Kerz made me this really pretty elegant card with Embrace Life- which I consider to be one of her signature sets (hehe)
For the second year in a row Becca Snell made me a card using Rub-ons. LOVE the colours- this is the new in-colour Bermuda Bay. It's really simple and pretty

Remember everyone- it's time for my annual Birthday SALE!! From now until midnight on Sunday I am offering 15% off all orders!

Wait- there's more!! In honour of my 31st birthday I will give you an extra $31 worth of products on all orders over $200!! That is on TOP of the regular hostess benefits for a $200 order. That means you will receive $51 of free product PLUS a free stamp set for $200- a great way to stock up on supplies! Especially with holiday card making coming up! Email or call me to place your orders